The Icelandic Horse Farm in Vernon, BC. has several breed specific books for sale. Both Joy and More Jof of Icelandics are very well recommended thru the IceHorsesWorldwide forum and I ordered both for the coming winter evenings to prepare for when my horsey partner announces itself :-)
Below a listing of any and all books Icy I've come across:
A Good Horse Has No Color, Searching Iceland for the perfect horse - By Nancy Brown CND
Joy of Icelandics - By Christine Schwartz CND
More Joy of Icelandics - By Christine Schwartz and Rikke Schultz, DVM CND
Sleipnir’s Story - By Sleipnir and Christine Schwartz CND
Understand Your Icelandic Horse - By Rikke Schultz CDN
New Age Vikings, The Icelandic Horse Volume I - by Elizabeth A. Haug
New Age Vikings, Horse Gathering in Iceland Volume 2 - by Elizabeth A. Haug
New Age Vikings: There is Something About The Icelandic Horse Volume 3 - by Elisabeth Haug
In the Hoofprints of the Vikings, Horse Trekking in Iceland - by Elizabeth A. Haug
The Icelandic Horse in the Home Country - by Johanna Sigihorsdottir (Author), Gary Gunning (Translator)
Living Your Dream, The Icelandic Horse Gletta - by Elisabeth Haug, Lars Perner
The Colors of the Icelandic Horse (English Language) - by Friðþjófur Þorkelsson
The Icelandic Horse (English Language)
The Icelandic Horse in the Home Country (English Language)
The Natural Colors of the Icelandic Horse (English Language) - by Sigurður A. Magnússon (Author), Friðþjófur Þorkelsson (Photographer)
Understand your Icelandic Horse - by Rikke Mark Schultz ISBN 87-989189-0-7
Riding the Wild Side of Denali: Adventures with Horses and Huskies - by Miki & Julie Collins
Easy-Gaited Horses: Gentle, humane methods for training and riding gaited pleasure horses - by Lee Ziegler
The Horse's Choice - by Staci Layne Wilson
For the kids:
My Horse Of The North (was titled Icelandic Pony) - by Bruce Mcmillan (Kindergarten-Grade 3)
Ariel's Journey (The Ice Horse Adventures, Book 1) - by Doug Kane, Christy Wood (Ages 9-12)
Horse Diaries #1: Elska - by Catherine Hapka (Author), Ruth Sanderson (Illustrator) (Ages 9-12)
Video:
The Icelandic Horse DVD - by director Sveinn M. Sveinsson $39.95
The Lure of the Highlands DVD - by director Sveinn M. Sveinsson $39.95
9.5-10 For Riding Abilities- The Ultimate Breeding Goal of the Icelandic Horse DVD - by director Sveinn M. Sveinsson
Riding the Icelandic Horse DVD - director Curt Worden $35
Around the World on Horseback / Iceland's Viking Horses DVD - by Bob Seemann 2005 $9.95
Im Bann der Pferde (TV series 2009) - English Translated by director Lisa Eder
2006 NEIHC Breeding Evaluations at Mill Farm, NY (video on demand) - directed by Steven T. Barber
Tolt with "Diddi" DVD - by Sigurbjorn Bardarson "Diddi" (Actor), Bjarni Thor Sigurdsson (Director)
Eyjolfur Isolfsonn Master Trainer: ON HORSEBACK, a Few Basics VCR - director Sveinn M. Sveinsson
Benni Lindal Icelandic Master Trainer: Training VCR by KVIK hf.
Friday, December 24, 2010
Icelandic Horse YouTube video's
A very nice german language documentary "Im Bann Der Islandpferde"or "Under the Spell of Horses - Iceland" by director Lisa Eder and filmed by Richard Ladkani. Three part posting, each 15 minutes.
Im Bann der Islandpferde 1/3 - 15:04 min.
http://www.youtube.com/watch?v=rqZpMJI1gy8&feature=related
Im Bann der Islandpferde 2/3 - 13:51 min.
http://www.youtube.com/watch?v=idXtcAi_I50&feature=related
Im Bann der Islandpferde 3/3 - 12:30 min.
http://www.youtube.com/watch?v=BZran0SxcE0&feature=related
"This film covers the story of an Icelandic family and their love for horses. They live in the northern part of Iceland breeding horses for a living. During the summer they embark on a journey across the vast highlands in order to find new feeding grounds between Iceland's biggest glaciers. To cover the trip across uncharted territory they take eighty powerful horses for the ride. It is a dangerous journey, due to the unpredictable and extreme weather conditions that can change within minutes."
RFD-TV's The Horse Show with Rick Lamb "Knights of Icelandic" episode 316
http://www.thehorseshow.com/rfd_schedule.aspx
Real Men Ride Icelandic Horses - TheThorgud 2:40 min.
http://www.youtube.com/watch?v=kfVoU_n97k8&feature=related
Icelandic Horses - Paul Taggart 3:17 min.
http://vimeo.com/18327413
a girl's fun video in the snow with her Icelandic 4:04 min.
http://www.youtube.com/watch?v=dH8yoBdGnaI
Im Bann der Islandpferde 1/3 - 15:04 min.
http://www.youtube.com/watch?v=rqZpMJI1gy8&feature=related
Im Bann der Islandpferde 2/3 - 13:51 min.
http://www.youtube.com/watch?v=idXtcAi_I50&feature=related
Im Bann der Islandpferde 3/3 - 12:30 min.
http://www.youtube.com/watch?v=BZran0SxcE0&feature=related
"This film covers the story of an Icelandic family and their love for horses. They live in the northern part of Iceland breeding horses for a living. During the summer they embark on a journey across the vast highlands in order to find new feeding grounds between Iceland's biggest glaciers. To cover the trip across uncharted territory they take eighty powerful horses for the ride. It is a dangerous journey, due to the unpredictable and extreme weather conditions that can change within minutes."
RFD-TV's The Horse Show with Rick Lamb "Knights of Icelandic" episode 316
http://www.thehorseshow.com/rfd_schedule.aspx
Real Men Ride Icelandic Horses - TheThorgud 2:40 min.
http://www.youtube.com/watch?v=kfVoU_n97k8&feature=related
Icelandic Horses - Paul Taggart 3:17 min.
http://vimeo.com/18327413
a girl's fun video in the snow with her Icelandic 4:04 min.
http://www.youtube.com/watch?
Tuesday, December 21, 2010
DIY cheese press

Easy to make Cheese Press from threaded pipes, dumbbells and a coffee can...
Dimensions don't really matter much, width depends either on the diameter of the cheese mold (coffee can) or the diameter of the largest dumbbells, whichever is largest.
You'll need:
one 2x6x24ish piece of hardwood (larger than width of sink)
one 1x4x24ish piece of hardwood for pressing board
two 1/2 inch by 18" pieces of threaded galvanized pipe (lowe's)
one 1/2 inch 8" piece of pipe for pressing plate
four pipe end plates; two for bottom board, two for pressing board
50lbs in weight; need to be able to make 10, 20 or 50lbs at a time
Drill two 3/4 inch holes in the pressing board to allow the pipes to stick thru.
Attach one end plate to middle of underside of pressing board
screw the short 8 inch pipe in, attach another end plate to end
this creates a nice pressing plate to divide force
Use new coffee can, 6-8 inch diameter, and remove both top lip and the bottom with can opener.
You can make an aluminum pie pan into a drip pan if you cut a small triangle out of one side and bend it down.
Funny enough; with all the expensive and elaborate cheese presses available, this one is actually easy to make, relatively cheap and works like a charm!
I got the hardware from Lowe's, each piece is about $5, and the dumbbells from the Salvation Army, at 25c a pound weight.
Now all I need is a decent Cheddar recipe...
weird tips from around the homestead...
From the Backyard Chickens Forum - Pesky Black Kitchen Ants!
"I read in Countryside Magazine about using a small pile of cornmeal where the ants can get it. The cornmeal is very corrosive to their digestive tracts and they die. They carry it back to their nest and store it for the others and they die also. Well, I tried it this year and.....it works!!! I was having black ants all over my cabinets and getting into my sugar! Within a week, no more ants. Haven't seen one since. I used fine yellow cornmeal. Left it on the counter for a couple of days only. Hope this works!"
From Countryside Magazine Volume 95 page 20
Minor Cuts
"Apply ground black pepper to stop bleeding. No, it's won't sting."
Minor Burns
"Immediately apply ice wrapped in damp cloth until the pain stops. It may take hours, but there will be no scar (tried it myself, the cold hurts, but then it fades away, and no blister!)."
Potato Growth Inhibitor
"Commercial potatoes are sprayed with a poisonous sprouting inhibitor. Peel potatoes before cooking. Cooking with peels on forces the poison into potato's flesh."
Advice from a German friend - Bee or Wasp Sting
"Immediately cut an onion in half with as much cells damaged to release as much onion juice as possible; rub vigorously onto sting site until pain goes away. Might need to re-cut onion to release more juice if necessary (also tried and it worked like a charm, hardly any swelling where I normally swell up like a balloon)."
Advice from my sister with night time hungry's
"Drink a little fruit juice or water with a big squirt of lemon juice with your evening meal. The acid of the lemon juice will trigger the stomach to release (more) digestive fluids, resulting in a better digested meal, less/no food left undigested in stomach and thus less/no 'hungry' feeling at night."
- collection in progress
homemade baby wipes / udder wipes recipe
I think I might finally have found my goat wipes! And of course the winner is the recipe from Fias Co Farm of course: I'll have to stop by Greenstar for essential oils and Wegmans for the off the shelf items - and keep my eyes open for a good food storage container (can always feed the contents to the chickens, if we or the kid won't eat it LOL).
From the Fias Co Farm website:
I like to keep homemade "goat wipes" on hand in the barn for cleaning up goat baby butts, or does during that "leaking time" after they've given birth, or just to wipe my hands. You can also use these as udder wipes since the essential oils give it an antibacterial quality.
To make your own goat wipes, find a food storage container (a coffee can will rust) that will hold a roll of paper towels that have been cut in half. Use only Bounty paper towels, anything else will just become a mushy mess. Cut a roll in half with a bread knife. Remove the cardboard tube. In the container mix:
* 1 Tbs. baby oil (or Calendula oil)
* 2 tsp. Dawn dish washing detergent
* 2 C water
* 5 drops Tea Tree essential oil
* 5 drops Lavender essential oil
(I used to add commercial teat dip in the hope that it would give it an antibacterial quality, but when mixed, the dip's strength dissipates quickly so it's really just a waste of money.)
Place the half paper towel roll into the container, remove it, turn it over, and place it back in. To use your wipes, remove them from the center of the roll.
Another baby wipes recipe, though not recommended for goat wipes as it is not antibacterial. From Backyard Chickens Forum
Strong paper towels work the best.
Cut one roll of paper towels in half.
Take out the core so wipes pull out of the center.
Make solution of 2 cups water, 1/2 cup of baby oil, 1/2 cup baby magic baby bath
Place 1/2 roll of paper towels in container. Pour solution over towels. Store in container. Makes 2 1/2 rolls.
From Countryside Magazine, volume 94 page 76.
Use a roll of absorbent paper towels and cut in half (so not use a serrated knife). Remove the inner cardboard core. Find a container with a lid for the roll to fit snuggly into. Cut an X or very small opening in the center of the lid. This is to pull the paper towels from the center of the roll through.
2 tablespoons Kosher V-6 Oil or (organic) olive oil
1 tablespoon unscented bath gel base
2-6 drops lavender essential oil
2 cups warm water
Note: she finds the V-6 oil much lighter on the skin than olive oil.
Sunday, December 19, 2010
natural Laundry Detergent available
one gallon jars of EGG DROP SOAP
or natural liquid unscented laundry detergent
$10 each
home made from traditional soap making recipe
bottled in recycled vinegar jugs
ingredients: water, fels naptha, borax, washing soda
directions: add 1/2 to 2/3 cup per load
add 1/2 cup of white vinegar to soften clothes if needed
shake well before use - separation happens (hence the egg drop appearance)
 I used it to launder my baby son's diapers since he has (had) skin problems from all the additives & scents - and now I use of for all our laundry :-)
the Icelandics of Rien Poortvliet
 If you are interested in the Icelandic Horse I uploaded several pages from Dutch painter Rien Poortvliet's book "Van de Hak op de Tak" to my Picasa page featuring Icelandics. He ended up owning / enjoying two Icelandic Horses, Gustur and Ko, and his paintings and drawings of the two are inspiring. Enjoy!
Maybe someday I'll take the time to translate the little stories he wrote with them...
suustainable Garden Benches
A new project; and available to the general public from Suustainable: repurposed wood Garden Benches. These beautiful low carbon footprint garden benches are available either as kit or assembled and are listed for sale on Craigslist.com in the Farm/Garden section.
 A little background:
I was looking for a nice wood garden bench to enjoy our swamp view with our toddler son. All the outdoor benches available are either poor quality and expensive, or good quality but very expensive - and all made from woods from very far away (pine imported from Germany?! hardwoods from California?!) even though New York has abundant wood resources.
So, I searched the internet for an ergonomic outdoor bench design and found one I really like, that sits wonderful and looks great. I made one, hauled it out to the woods and the swamp overview and have never had so many positive remarks about one of my projects...
Since I enjoy wood working and really enjoy "jutten", a Dutch word for going to the beach after foul weather and finding 'free' goodies (my granddad actually was a real one, found many interesting things on the beaches of Vlieland) I hereby offer my building and collecting skills to you for a nominal fee :-)
 About my benches...
- Each one is different, depending on the resources available.
- The woods used are:
• locally harvested and milled ruff cut or finished hemlock
• rescued shipping wood (mostly pine)
• locally harvested and milled natural edge hardwood planks
- The legs, backrests and armrests are either hemlock or hardwood for durability and safety.
- The armrests are sanded down with rounded edges for comfort.
- Weather resistant hardware (star bit self drilling screws).
 The benches come in three basic designs:
- Made from repurposed materials only: $75 kit or $100 assembled
- Frame made from repurposed materials, back and seat natural edge hardwood: $90 kit or $125 assembled
- Both frame and seat made from finished hemlock: $110 kit or $150 assembled
The kits come with detailed instructions, clearly labeled pieces and a baggie of hardware. It takes me about 5 hours to cut and assemble one bench. It should take you about 1,5 to 2 hours to assemble one, less if you have woodworking experience.
You can set it in the garden as is for at least a decade (and a half) of use, or treat it with your preservative of choice (wax, oil, stain or polyurethane).
Contact us for more information or to order!
Pick up in Ithaca on west hill near the hospital or delivery within reasonable distance.
Saturday, December 18, 2010
Why do I like horses? I think I must be mad.
My mother wasn't horsey - And neither was my dad.
But the madness hit me early - and it hit me like a curse.
And I've never gotten better. In fact I've gotten worse.
I hardly read a paper - but I know who's sold their horse.
And I wouldn't watch the news - Unless Mr. Ed was on - of course.
One eye's always on the heavens - but my washing waves in vain
As I rush to get the horses in - in case it's gonna rain.
I spend up every cent I've got - on horsey stuff for sure
I buy harness, carts and fancy boots - and then I buy some more.
I can't sew on a button - I don't even try
But I can back a truck and trailer - in the twinkling of an eye.
It's jeans and boots that I live in night and day
And that smell of sweaty horses that just wont wash away.
I ache from long forgotten falls. My knees have got no skin.
My toes have gone a funny shape - from being stomped on again and again.
But late at night, when all is still - and I've gone to give them hay,
I touch their velvet softness and my worries float away.
They give a gentle nicker and they nuzzle through my hair
And I know it's where my heart is - more here than anywhere.
- Author Unknown
reposted from the St. Skutla Icelandic Horses Yahoo Group.
Friday, December 10, 2010
have spare energy?
go chop down a bunch of trees and built a few bonfires - it works like a charm :-)
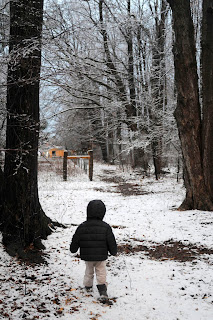
After learning about the bone tumor thingy I got just a little nervous... Instead of googling tumors or thinking about any biopsy results I thought of something laborious to do that Simon the 2 year old would enjoy as well and voila: now we have a walk through the woods. Nice thing is that Simon fairly regularly asks to go hike back there (bos! bos!), not so nice thing is that it suddenly turned winter and halfway through he or we get chilled and then it's a long way back to the house... but hey, we're Dutch, back yards that large is not something we should complain about :-)
I know, it does not look like much, but believe me: there were so many small shrubs and fallen wood even Simon could not get through without getting caught, tripping or tripping while getting caught! So I built a small wood collector on the trailer of the lawn tractor (basically six upright 2x4's , one in each corner and one in the middle of the long sides to gather all the downed wood and chopped down shrubs to the bonfire pit. I think I did that for about two weeks, several times in the weekend once or twice during week days depending on weather - I must have hauled at least 25 loads of scraps out of those woods to make it (goat) kid safe! I really had some energy to spare, I guess :-)
 This view is looking back, the mature trees are on the house side and the New York State Protected Marshland (we call it the swamp) is on the left. Which does mean about half the trail is pretty muddy so when it has rained the lawn tractor has a tendency to get really stuck! I did get two car trailer loads of wood chips from the city to raise things up a bit which does help (no snow cover means wet, muddy ground in pics), but for now when it's really wet it's just not drivable.
And why all this effort?
Couple of reasons: my handicapped sister comes to visit us in February and I plan to have her ride the lawn tractor (snow chains?) all around the place to see for herself what all the fuss is about. She sees the postings and the pictures but last time she was here we tried to push her around in the wheel chair and that just did not work.
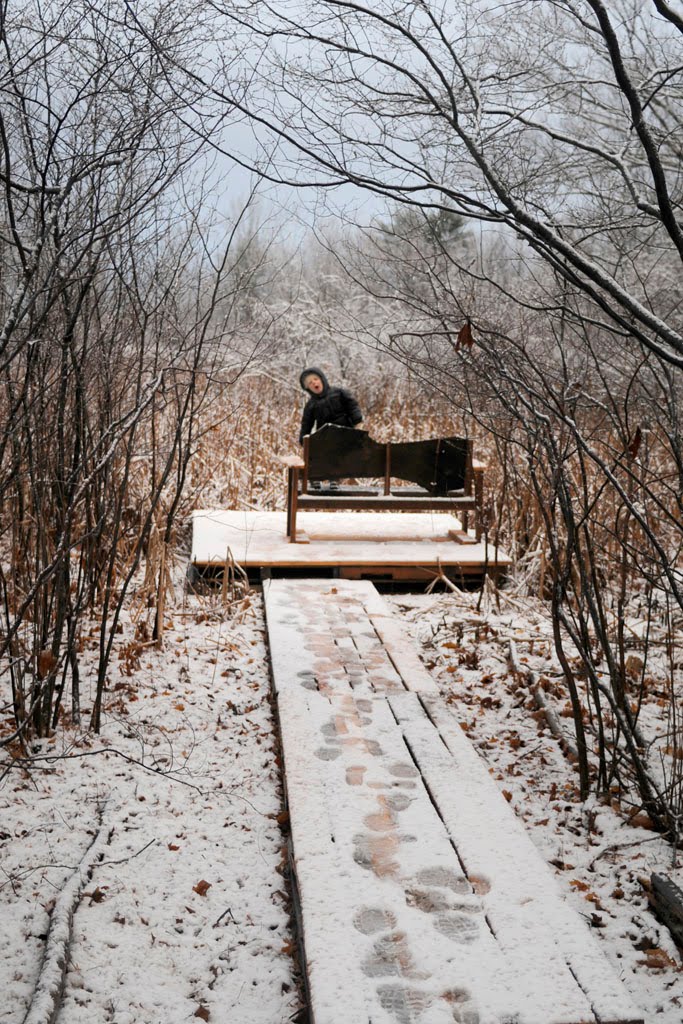
Simon needs his physical time, especially in winter. The boardwalk is not all that long yet - large water willow came down and needs to be chainsawed first - and this loop thru the woods makes our hike around the goat pasture just different enough it's fun. Plus, I made a raised platform with a bench (so I can take a rest) for an open view over the swamp and that just turned out gorgeous... the view's not ours but I don't think those neighbors would mind sharing it!
 And one more thing: goats like woods. Hopefully this spring I can fence off part of the woods to create a temporary pasture for the girls where they can munch young tree growth in spring (keeps the forest floor more open) and leaves in fall. They won't be allowed in there when they're into tree bark (mostly late fall & winter) to protect our beautiful large sugar maple trees.
 I situated the trail with an eventual goat fence in mind as I would like to use live trees as occasional fence posts with steel t-posts in between. From Michael's swamp experiences, most of his pasture is wet at least part of the year, I learned to use tall ones - and so we learn from each others' experiences!
After learning about the bone tumor thingy I got just a little nervous... Instead of googling tumors or thinking about any biopsy results I thought of something laborious to do that Simon the 2 year old would enjoy as well and voila: now we have a walk through the woods. Nice thing is that Simon fairly regularly asks to go hike back there (bos! bos!), not so nice thing is that it suddenly turned winter and halfway through he or we get chilled and then it's a long way back to the house... but hey, we're Dutch, back yards that large is not something we should complain about :-)
I know, it does not look like much, but believe me: there were so many small shrubs and fallen wood even Simon could not get through without getting caught, tripping or tripping while getting caught! So I built a small wood collector on the trailer of the lawn tractor (basically six upright 2x4's , one in each corner and one in the middle of the long sides to gather all the downed wood and chopped down shrubs to the bonfire pit. I think I did that for about two weeks, several times in the weekend once or twice during week days depending on weather - I must have hauled at least 25 loads of scraps out of those woods to make it (goat) kid safe! I really had some energy to spare, I guess :-)
 This view is looking back, the mature trees are on the house side and the New York State Protected Marshland (we call it the swamp) is on the left. Which does mean about half the trail is pretty muddy so when it has rained the lawn tractor has a tendency to get really stuck! I did get two car trailer loads of wood chips from the city to raise things up a bit which does help (no snow cover means wet, muddy ground in pics), but for now when it's really wet it's just not drivable.
And why all this effort?
Couple of reasons: my handicapped sister comes to visit us in February and I plan to have her ride the lawn tractor (snow chains?) all around the place to see for herself what all the fuss is about. She sees the postings and the pictures but last time she was here we tried to push her around in the wheel chair and that just did not work.
Simon needs his physical time, especially in winter. The boardwalk is not all that long yet - large water willow came down and needs to be chainsawed first - and this loop thru the woods makes our hike around the goat pasture just different enough it's fun. Plus, I made a raised platform with a bench (so I can take a rest) for an open view over the swamp and that just turned out gorgeous... the view's not ours but I don't think those neighbors would mind sharing it!
 And one more thing: goats like woods. Hopefully this spring I can fence off part of the woods to create a temporary pasture for the girls where they can munch young tree growth in spring (keeps the forest floor more open) and leaves in fall. They won't be allowed in there when they're into tree bark (mostly late fall & winter) to protect our beautiful large sugar maple trees.
 I situated the trail with an eventual goat fence in mind as I would like to use live trees as occasional fence posts with steel t-posts in between. From Michael's swamp experiences, most of his pasture is wet at least part of the year, I learned to use tall ones - and so we learn from each others' experiences!
what I learned about worming goats
This whole goat keeping has quite a learning curve, especially since any book you read and anyone you'll ask has a different opinion and way of doing things! Plus, most internet sites are not local to your area so what works for them does not necessarily apply or work for you...
in short: what I learned asking anyone I could find:
don't try and figure it out yourself, instead focus on finding a goat specializing veterinarian and have her inspect your flock and living conditions and ask for advice - she knows the area and any problems other goat keepers might have.
do not worm everyone and do not worm on a schedule - consult with a vet, or collect fecal samples yourself, for fecal worm egg counts and only treat the ones who need it. It's just like antibiotic use: the worms become resistant from regular exposure.
do no listen to sales people; they're great for general info but are not trained vets...
if you find a wormer off the shelf do not trust the dosage on the label if it is not specifically labeled for goats; of course they are different and need a much larger dosage a vet will need to tell you...
In our area Cornell Ambulatory Clinic and especially Dr Mary Smith are very good goat resources. They sure know about goats, come right to the farm and are affordable. They will let you (and show / teach you) give subQ injections like booster shots and they can process your fecal samples to determine your worming schedule. Dr Mary Smith prescribed labeled for goat Safeguard, available locally at Tractor Supply for about $20, to worm my herd of three (but only two, the kid was ok).
I found two other wormers which I'm interested in:
Molly's Herbal Wormer which is a weekly feed additive consisting of once every 8 weeks a dose of formula 1 herbal wormwood combination and the other weeks a dose of formula 2 herbal weekly worm formula & tonic. It's not that expensive, it's organic and it helps boost general health and the immune system. But; formula one can not be used in pregnant goats, and of course I just bred both Thirteen and Monica...
Another one that looks interesting, and is also available for poultry, is Verm-X USA which are certified organic herbal intestinal parasite control pellets. It seems to come out to about the same cost per month, or maybe a little more than Molly's, but they're imported from England and it does not always seem to be available.
Both Molly's Herbals and Verm-X have horse specific organic wormers available as well.
Wednesday, December 8, 2010
what happens when the barn turns out better...
... than you'd ever thought possible? Horsey thoughts pop up again!
I was already (semi) joking to get a pony for Simon when I found out I could get a pony for me as well! Oh my god, all my childhood dreams (well, I only had one dream) within arms reach! No wonder I'm driving hubbie Rolf nuts with my sudden onset of horse obsession :-)
I'll copy/paste something I wrote as an introduction for the yahoo forum of our very nice local Icelandics organization called the St. Skutla Icelandics Horse Group couple days back (with my right hand swaddled from surgery typing is not my strong point right now):
"Thank you for your warm welcome!
I sorta rolled into the Icelandic awareness, having thought for a while our property did not lean itself for horses and not wanting to stable somewhere else - I wouldn't want to my kid off to boarding school either! Then we got a couple meat goats, which evolved into a couple milk goats which needed fenced pasture - and a winter barn... and seeing the new structure go up - much larger & nicer than it looked on paper - made me wonder about getting a pony for our toddler son someday.
So here I was, googling pony housing information, thinking of the ponies back home (we're from the Netherlands, lots of fjords and ijslanders) when I came across a picture of Altario (Pangea) getting ready for a hunter pace event (my newly discovered absolute favorite outdoor event). And oh my goodness, it suddenly dawned on me: a horse might not fit, but Icelandics sure would; we've got an acre of fenced meadow pasture and a 14x10 walk in stall - and I can ride and even jump one!
Unfortunately, my hubbie has not quite progressed from the acquiring goats to acquiring ponies/horses yet - the barn's not even finished... but I'm not sure he realizes the forces of nature at play here! I'm not sure it's safe to stand between me and my own horse - as a matter of fact, it's what got me to America in the first place LOL"
 This is my ideal horse "Altario". He's for sale at the Pangaea Farm in the White Plains: he's beautiful, jumps hunter paces but alas, is very much out of my budget... you can check out him and other gorgeous horses on the Pangaea website.
the goat barn is looking great!
 And I am so proud of my hubbie Rolf for pulling it off... though having that "it'll be winter soon" deadline sure was motivating! We just about made it in time, they moved in about three weeks ago, initially without front door and windows but anything is better than a tarp tent, I'm sure. With the last November windstorm Monika aka Mountain Goat did catch a bit of a cold I think, plus Gazelle stopped nursing (and Whitey is safely rutting in the bachelor pad) which made her milk production drop significantly as well with me only milking in the mornings.
I did get her back up to milking fine again, only to find out I would need to stop milking her soon anyway so right now she's dried off and on her date with boer buck Octavian. Not sure why I missed her estrus last month, maybe being miserable from her cold minimized the signs; plus, with the new barn and the cold weather nobody is hanging out with Whitey anymore so he's not as good of an estrus "thermometer" as he was with Thirteen :-)
The barn is not completely done, but mostly done, and definitely working. We have heated water buckets, a place to separate Thirteen from her kid overnight, a large keyhole hayfeeder in the walk in stall, haybales stored within the barn - no juggling flakes of hay while trying to open and close gates - a separate area for the milk stand so I don't have to scrape poopies off every morning, opening & closing double pane windows, a dutch door and since a couple days: light at night! It's funny how "camping out" with minimal resources really makes you appreciate when you do get some!
 And why I had to stop milking? Turns out that annoying pain I had in one of the knuckles of my right hand was a (benign) bone tumor - go figure! The milking aggravated the tumor (not used to this sore muscles etc) and made it show it's ugly head before it had grown large enough to be felt or seen, so the removal surgery was not as invasive as it could have been. Still they removed about a garbanzo beans' worth of bone, which was grafted and returned from one of my arm bones to give the knuckle ligament something to anker to. The surgery went fine, and I can still milk Thirteen (one handed) but other than that am pretty much confined to the couch & computer... Bummer!
Thursday, November 18, 2010
no-knead bread recipe update
There are various recipes for no-knead bread available and I started with the one published in a mother earth article last year or so. But, the bread was pretty dense, tasted a lot like sour dough, and did not really rise very well. I tweaked the recipe and came up with a slightly different but just as easy a version that does rise well, has a good crust and nice air pockets throughout - and still needs no kneading :-)
5 cups all purpose (or white) flour
1.5 cup whole wheat flour
3 cups lukewarm whey (or water)
2 teaspoons of herbed salt
2 teaspoons of granulated yeast soaked in warm water with
1 teaspoon sugar
soak the yeast in a little warm water, whisk well
add teaspoon of sugar for food
add flour and salt to bowl
use dough hook, add whey and yeast
knead until ball forms and dough does not stick to sides
leave in bowl, cover with damp towel for about 1-2 hours
remove from bowl, split in two (with floured hands) and pat into bread pans
the two major differences are:
presoak the yeast, and do not refrigerate the dough.
I like to make one long cut in the middle, it makes for a nice split top. A little flour on top looks good as well. It also does real nice as a pizza crust.
And how do I know it's a good tweak? Cause my hubbie told me this morning not to buy the Heidelberg bread anymore, he definitely preferred this new version...
Same with my small herbed chevres... I gave one to a good friend of mine and she told me later she still could not believe I actually made it myself, and she sure was not sharing with her roommates! This from a person who grows carrots and sweet potatoes as big as baseball bats!
firm goat yoghurt recipe
... with a little help from my gelatin friends :-)
Initially I used a recipe from an article out of countryside magazine, but it did not stiffen correctly. I kinda wondered about that anyway (plus, it used sugar) cause the way I use gelatin for cheesecake sure is different. I retried the recipe but followed the gelatin directions this time and the yogurt looks great!
Heat milk to 185 degrees and hold there for 5 minutes (kills off competing cultures).
Cool milk rapidly in sink of cold water to about 115 degrees.
Add two table spoon fulls of yogurt live culture.
Sprinkle 1 packet of gelatin in some cold water, let sit for 1 minute.
Add milk with yogurt to dissolved gelatin, whisk very well.
Pour into yogurt maker jars, let incubate for 12 hours.
(the longer the incubation the more bitter the taste)
Refrigerate, which stops incubation and sets gelatin.
like I said, it's yogurt for dummies!
Friday, November 12, 2010
very easy hard cheese recipe
A new recipe I found in the Barnyard in your Backyard book Goat section page 225... I made a batch today and have the curds setting in the (home made) molds in the fridge... we'll see about the claim it's a grateable cheese in about 2 and a half hours!
Heat one gallon of raw goat milk to 185 degrees F and keep there for 5 minutes.
Add 1/2 cup of lemon juice to separate the curds.
Drain the whey and stir in a 1/2 teaspoon of salt.
Press the drained curds into molds and set the molds in a strainer to drain further.
In about 2 hours you should have about 1.5 lbs of mild tasting hard cheese to grate...
Wrap the cheese in plastic wrap and keep in fridge for up to two weeks!
I made the molds from butter containers (food grade plastic) by melting holes with a heated piece of metal about 1/16th of an inch thick (piece of galvanized fencing).
Very curious to see what it will become!
>>>Tried the recipe, two times, once with my new cheese press, and the cheese does not get hard... It's more like panir; not soft cheese, but not hard either. Does not grate but does crumble. I use panir for curry since it does not melt like chevre - but it definitely is not grateable hard cheese :-( The resulting whey is great though!
I started to herb, salt and shape the chevre (2 gallons makes about 7 herbed cones) which I then wrap in plastic wrap and freeze for the rest of the year until milking resumes in spring. I also made cream cheese by whisking not too dry chevre in the kitchenaid (very good!). If only I could make a decent hard cheese :-)
Wednesday, November 10, 2010
Thirteen goes on a date!
My first time, though it seemed like nothing special to Thirteen :-) Which is why I got the two older does, they've done all this stuff before!
Here's Thirteen meeting Octavian, the 120lbs 1,5 year old full Boer.
 "well, hello there!"
 "you smell sooo good..."
 "my, you're a big boy!"
 'I luvvv you!!!"
 "I like you too..."
And that six times in the couple minutes Michael and I watched! She'll be there the rest of the afternoon - they seemed to have a good time - and Mountain Goat will have a nice easy day without hormonal bullying from her herd queen!
And now we have to wait five months...
Wednesday, November 3, 2010
from rain to snow...
 from one day to the next! It really is too bad, the two cold nights we've had killed all the flowers including the dahlia, cosmos and marigolds which were all still going on strong! Most of the nasturtium in the veggie garden gave the ghost as well and the pepper plants in the uncovered window boxes were toast and served a nice, hot snack for the goats this afternoon.
First year we've had a flower garden and I must say it sure was a success! I'll be looking for flower seeds at the seed savers this year as well, to make my own seed shaker mixes.

my patchwork privy
 After two years of slowly digging away at the pit, I finally was able to quit and start building my privy! And good timing too, as our two+ year old started potty training and while playing in the yard did not want to go all the way back up to the house to pee... Which is where this two holer, toddler size version comes from.
Since I knew for quite a few years I wanted to build a privy I was able to collect materials for quite a while. After the build of our timberframe garage / workshop we had a lot of scraps left over and combined with the old basement shelving (5" cherry tongue and groove boards) and a whole stack of lake house paneling (5" pine tongue and groove) I found one day alongside route 34 it seemed time to start.
 We also had a couple 2x6" rough cut left overs stored behind the shed I could rip into 2x3"s for the main structure, combined with some rough cut dollar 1x4" planks and ripped scrap packing wood from lowe's for the less than 40" long boards I did not have to go out and specifically buy anything but the door hinges! Oh, and two ventilation panels I kinda forgot to install I just realised (after sitting on a wet seat from ground condensation)!
Oh, the roof are two pieces of (new) left over metal roofing panels used to protect the timberframe roof when it got shipped. And I also had two old but working louvre shutters I cut down short and installed as windows and ventilation. Initially, they were also the main source of light, but since the inauguration bonfire party showed that nobody uses an unlit privy on a dark night I did install a pull cord light fixture inside (also a leftover...) which can be plugged into an extension cord. No point in going thru all the effort if it does not get used :-)
 For more pics on the project - though I did not take many pics as I was too wrapped up in the actual build - you can check my patchwork privy on Picasa.
Thursday, October 28, 2010
rain barrel... oh no, wheel barrow!
 couple weeks back we had sooo much rain in one day that my wheelbarrow pretty much filled up... no wonder my shoes sank into the lawn the next morning when I went down for milking!
Thursday, October 21, 2010
Ithaca Freecycle
The ulitmate in reduse, reuse, recycle! I did not quite realise how it worked, only that it needs a dedicated yahoo email account unlike google thingies. So I made a yahoo account and then I still could not use it... turns out it's like a group or forum and you have to use your yahoo membership to become member first. Man, I so no not get computer stuff! Says the person with the blog, haha.
But, long story short, if you like to get free stuff and like to give away free stuff, all local, Ithaca Freecycle is the way to go. Though, if you like to get stuff it pays to check your email more than once a day :-)
I just got my hay barn all filled up again with goat hay, free, from a lady who had to let go of her flock and had it just sitting around taking up space... It is sooo nice to start winter with a full barn! Oh, and let's not forget the two boxes full of assorted canning jars... it was like Christmas!
Oh, you don't need to use the yahoo email if you don't want to - once your membership is approved you can change your settings and add any other email address for both sending and receiving. Yay!
By the way, there is a new (ish) store in town called ReUse that's good for getting reused timber, building materials similar to Significant Elements and home stuffs like the Salvation Army. They have a sister store next door which offers reused computer equipment. They're located in the Triphammer Mall, in the old Millers store.
goat tent makeover!
 Another thing that had to change when we got back from our trip was to separate the kids from the moms so I would actually get any milk! I got about a cup, maybe two for two goats per milking, which does add up, but is not really rewarding. With all those hardwood pallets I found recently (I am always on the look out for another project) I decided to go the wood way and make pallet dividers. I reused the old door from when the tent was a chicken tractor (the goats demolished the chicken wire, took them a couple weeks but man, they shredded the stuff) and now have a nice enclosure of 4 feet deep and 10 feet wide. And get about half a gallon of milk each morning with no milking needed at night (the kids take care of that...) - I should have done this months ago!
 I mounted three feeding troughs (those cheap plastic mineral feeders), one for each goat (Spots the boer boy, Gazelle and Fuzzy Bear) and a water bucket and reused two of the three floor pallets to raise the floor to keep them dry at night. It is surprising how well it works!
And the best part? Since I am "handling" the girls, as in moving them about even though I don't touch them as they know where to go (they're smart, took them only a couple times to figure out the routine) they became so much more interactive! Especially Gazelle, who at first was as flighty as can be, is coming for snuggles :-)
Their different characters are also much more apparent, Spots DOES NOT SHARE, especially food, and he'll headbutt from feeder to feeder to try and claim them all... Gazelle just follows him around - it's like musical chairs, with a goat bleating with it's mouth full as accompaniment! Fuzzy Bear will try and eat once or twice, get butted and then decide the food isn't all that good and start eating the fresh hay... with her rear towards the others!
Gazelle is up for grabs, btw, we put her up for sale... Not really set up to take four goats through the winter! Though our goat barn is moving fast, last weekend the roof rafters went up with help of our goat buddy Michael, this week we plan to have the new metal roofing on as well. Wow...
Check the Picasa site for pictures at the Goat Barn Project.
tomatoes...
 Yeah, yeah, I know, it's been awhile... one tip: do not take a vacation in the middle of September if you are growing most of your own veggies! We had sooo much catching up to do, for a while I was canning multiple loads nearly every day. Didn't need the heater on though :-)
The ducks that hatched during our trip are all doing very well, they now live in our "swimming pool" in the back yard and have a little house with a heat lamp to help with the cold, cold nights. They started feathering out and it seems like they are all completely white... which is too bad, I was hoping for at least one black and white duck!
The cayuga duck eggs in the incubator did not make it, the incubator ran dry during our vacation. I had installed an automatic turner to help ease the pet sitter, but did not think to remind her to still check the water level... that sucked, but hopefully my friend will trust me with another dozen come spring! And I did locate a good source for mixed breed duck eggs (including appleyard) for a very reasonable price at Daring Drake Farm, one of the Ithaca Farmers Market ag vendors.

Something real interesting I saw at the Farmers Market was this perfect tomato with a perfect monarch butterfly cocoon attached to it's side! Real strange, and what a beautiful colors in that cocoon - it's almost like Chinese art with the subtle gold touches...
Thursday, September 16, 2010
we're got ducklings!
Even though I had calculated the eggs would hatch just before we went to NC, they actually all hatched right in the middle of our trip! Our petsitter called us, unsure what to do, and it seemed like all but one egg hatched successfully :-)
Guess where we're staying in NC... on the Outer Banks in a little town called DUCK!
Guess where we're staying in NC... on the Outer Banks in a little town called DUCK!
Tuesday, August 31, 2010
knock, knock;, who's there?
 A little Downey woodpecker! I had the garage door open and it looks like he flew in that way but then got confused by the two eave windows and kept flying from one to the other without ducking back out by garage door... I finally caught him with my improvised chicken net at the part of the workshop that has a second floor and I can actually get to the eave window ;-)
He was soo cute, and definitely not someone you want hammering around in your new timberframe building!
duck egg surprise!
 Even though we had a surprise 40th birthday party Sunday for my hubbie, it was I who was surprised with a dozen of Cayuga Duck hatching eggs! I felt like early Christmas :-)
I stuck them in with the Muscovy eggs and will transfer them to the other incubator when those hatch. No sense in having two going at the same time! Unfortunately, it looks like our surviving rooster Eddie the buff Silkie is a bit of a dud - NONE of the chicken eggs were fertile when I candled them! Man! We need a better rooster for next year...
oh, you can actually see a difference between the Cayuga duck and Muscovy duck eggs here, the cayuga ones look almost orange and the others sort of white greenish. Which is funny since cayuga ducks are famous for their dark green eggs when they first start laying!
new hay manger
 When we split the kids from the mommy goats we needed a second hay manger, so I choose one I'd seen on our recent trip back to the Netherlands which seemed to be freestanding. The design and it's use is easy, but it is not a freestanding design - we found out... The very same day we put it in the goat yard they'd tipped it over and Mountain Goat got stuck under it.
She had a small cut on her leg, which did not bleed real much and with bag balm is healing real nicely. She also seems to have pulled or torn a muscle behind her shoulder blade / scapula. Her front left leg is winged out a bit, but though she initially limped there never was much heat or swelling and she's walking fine on it now - not even a week later. The Cornell Ambulatory vet students checked her out as well - I was afraid after talking to friend and RN Eileen she might have dislocated her shoulder - but there was not much to be done. So I help her off the milk stand to be nice, though she did not even want any help with that either this night :-)
I permanently screwed the manger to the split fence post, and found that having it there is really nice because I can fill it without having to go into the pasture! Oh, apart from the 2x4" hemlock the rest is all 1x4"s "dollar pile" wood from saw mill Collins with a piece of left over roofing from our new workshop garage. Nice!

I found a bunch of hardwood pallets last week, perfect for extending Simon's Swamp boardwalk! There are more pallets where these came from, sort of hidden from view behind a dumpster and the plan is to have everything transported to our driveway soon. The car only fits 5 at a time...
Check out these mushroom pics below, we had soo much rain last week the woods are just breaking out in 'shrooms!
 I did get three very nice pallets from behind a strip mall dumpster which I altered into a subfloor for the goat tent. With the humongous amount of rain we had last weekend - 5 inches in a day - the tent bedding submerged, the goats got wet, and the two boer boys got sick with coccidiosis. So now I have to chase them each night to give them very foul tasting medicine - which they "love"... it's good exercise though :-)
 Mr. Whitey checking out the new raised floor. Initially I planned to cover it up with hay bedding but they seem to like the floor the way it is.
Monday, August 30, 2010
fried zucchini chevre pancakes recipe
If you are local to 14850 and love gardening, canning, livestock keeping - in short, the sustainable life in any shape or form - the forum Ithacan.ning.com would be perfect for you as well!
From the Ithacan "Veggie Gardens" forum - zucchini feta pancake recipe:
Something else you can do with those extra zucchini is make zucchini lasagna. Replace the sheets of pasta with strips of 1/4 inch zucchini. Just as filling with a lot less carbs.
And not to forget stuffed zucchini, with a tomato sauce, ground beef / pork and brown rice filling, sprinkled on top with shredded sheep cheese and baked in the oven (350F for about 30 minutes - prebake zucchini, sliced in half, scooped out and seasoned with olive oil and pepper for at least another 30-45 minutes to make sure it's done).
Doesn't this look good?!

Here the pancakes are sizzling in the skillet. This was a first for me, frying in open oil. And a bit disconcerting, after seeing the Mythbusters Fire in the Hole exploding frying oil episode...
 all done :-) I stacked them between two plates to keep them warm after degreasing (sort of) on paper towels.
From the Ithacan "Veggie Gardens" forum - zucchini feta pancake recipe:
"CrowJoy": Mine is loosely based on the Moosewood cookbook recipe for zucchini feta pancakes, I just use whatever I have. Shred the zucc, add in whatever herbs you like (I usually freeze the chevre already herbed but mint and green onion is what the original calls for) and any onion/garlic/other veg you want, add about 6 eggs well beaten and the cheese. Add enough flour to get a good pancake consistency. For fun you can add panko (for crunchier) or baking soda/powder (for puffier) pancakes. Fry in shallow oil until the egg is cooked, drain, cool and freeze.I tried this recipe with about two large shredded zucchini, about a cup of (dry) goat chevre and lots of homegrown crushed garlic and chopped chocolate mint. I was not sure about the amount of flour and should have used more, liquid appeared in the batter about halfway through the frying. We had a whole stack of cakes and came out with at least four two and half person meals! Great, and the toddler gobbled them like french fries...
Something else you can do with those extra zucchini is make zucchini lasagna. Replace the sheets of pasta with strips of 1/4 inch zucchini. Just as filling with a lot less carbs.
And not to forget stuffed zucchini, with a tomato sauce, ground beef / pork and brown rice filling, sprinkled on top with shredded sheep cheese and baked in the oven (350F for about 30 minutes - prebake zucchini, sliced in half, scooped out and seasoned with olive oil and pepper for at least another 30-45 minutes to make sure it's done).
Doesn't this look good?!

Here the pancakes are sizzling in the skillet. This was a first for me, frying in open oil. And a bit disconcerting, after seeing the Mythbusters Fire in the Hole exploding frying oil episode...
 all done :-) I stacked them between two plates to keep them warm after degreasing (sort of) on paper towels.
remember our sugar maple adventure?
This is the result: a wonderful stack of different sized wood planks, both straight cut and natural edge... We never had a good tree go down before, but man, am I glad I pursued the idea to have it milled instead of chopped into firewood! We even have a couple planks nearly 20 inches wide, you don't see (commercial) hard wood that wide very much anymore, the big trees just aren't around the way they used to...
 And yes, that is my bike. I am fortunate to be able to pick up our son from daycare by bike - if I want too :-) He loves it though, and points out all the interesting things along the way. I'm mostly panting, trying to get back up the hill (it's 2 minutes to school and at least 20 minutes to get back home...).

We're not really looking to sell the wood, though I did talk to a woodworker at the Tburg Farmers Market (a possible trade for a side table) and a fine carpenter, welder, sculptor neighbor Rob Licht ( a possible trade for a bonfire bbq grill). And of course, not to forget, our initial trade with Ithaca Farmers Market woodworker Dave Brown who paid half the milling fee for a fair share of boards. Thanks, Dave, for making this (ad)venture possible!
 And yes, that is my bike. I am fortunate to be able to pick up our son from daycare by bike - if I want too :-) He loves it though, and points out all the interesting things along the way. I'm mostly panting, trying to get back up the hill (it's 2 minutes to school and at least 20 minutes to get back home...).
We're not really looking to sell the wood, though I did talk to a woodworker at the Tburg Farmers Market (a possible trade for a side table) and a fine carpenter, welder, sculptor neighbor Rob Licht ( a possible trade for a bonfire bbq grill). And of course, not to forget, our initial trade with Ithaca Farmers Market woodworker Dave Brown who paid half the milling fee for a fair share of boards. Thanks, Dave, for making this (ad)venture possible!
something to share...
 A small part of your vegetable harvest of this year, including fltr cucumber, lemon cucumber, more ball zucchini and three types of heirloom regular zucchini... We had playgroup that afternoon, and these veggies were for the taking. Anything left over goes into the basement, where it keeps fine for at least a couple a weeks. I love my basement!
Part of my new flower garden...
I used old snow fencing to keep the chickens out - too much scratching - which makes for a very photogenic wood fence! This is cosmos, grown from seed. The plan (for now) is to grow perennials in the bed closest to the greenhouse and sow the rest in with annuals, like cosmos, nasturtium, morning glory, sunflowers and marigolds. I even found a couple bags of dahlia bulbs for free I planted just in time late spring!
hatching eggs again...
The one time we come home after dark because of work - I was part of our local annual Artist Market - a fox had gotten into the coop and killed about half our flock! I did not even notice when I closed the door Friday night... but the next morning it was quite clear something had happened, apart from the couple dead bodies in the building itself, the rest of the flock was very quiet and demure... I lost a khaki campbell (two more the next night when I put them in our veggie yard on slug patrol, apparently the veggie yard fence was not high enough, poor birds) and about 10 chickens, including my two new home grown roosters!
And how did I know it was a fox? Because the triple next door neighbors saw it trotting past their porch Friday evening with one of my chicken in it's mouth! Their dog immediately ran at it and scared it to drop the boy, it was one of my boy roosters, and it took shelter under their porch. A day or two later he was calm enough I could come over and catch it - but even though I was very relieved and grateful they called about the homeless chick I did not want to get it; it was Them. That was soo strange, even though they had their little two year old toddler grand daughter running around and I wanted to invite them to our bi-weekly playgroups I just could not get the words out of my mouth... all that cause the man of the house decided to become territorial to all his neighbors with his 30 acre property... oh well, at least I had my boy back.
 So, to make up for the losses we put about 35 chicken eggs and about 12 duck eggs in my two new incubators. They're the ones I got (for free!) on craigslist so I did not know whether they would even run, or if they would hold their temperature - but low and behold, two of the three work perfectly and one of the automatic egg turners works fine too!
 It feels so "lazy" to have a turner - I'm used to turn them all by hand. But I must say, I have not incubated that many eggs at once before! I am so curious to see all the different chick combinations - we have quite the collection now... hatching sure is fun :-)
Friday, August 27, 2010
goat dewormer information
I've been doing some google research to figure out how to deworm our goat flock and what to use. I came across a very informative article (the whole website has lots of info and explanations):
There are three "classes" of deworming medication:
1) Avermectin (Ivermectin). The "clear" dewormers. Ivomec, Dectomax, and Cydectin/Quest Gel fall into this category. Effective against meningeal deer worm, lungworm, and lice. Not effective against tapeworm. Although some Ivermectin is labeled for injection, it produces a quicker "kill" when given orally to goats (Quest Gel is packaged in a plunger-style tube for use with large animals, making it both difficult and wasteful to use because calculating and controlling the dosage small enough for goats isn't easy).
2) Benzimidazoles. The "white" dewormers. Valbazen, Safeguard/Panacur, Synanthic, Telmin, Benzelmin, Anthelcide, TBZ. Effective against tapeworm. Do not treat pregnant does with Valbazen; it can cause abortions.
3) Imidazothiazole: Tramisol, Levasol, pyrantel, morantel. Pregnant does may abort if Tramisol is given to them. Additionally, the "safe" and "toxic" dosages of Tramisol are very close, making this product a potentially dangerous drug.
The Fias Co Farm website article about goat wormers is a great addition to this information.
Fias Co Farm also mentions Ivermectin or Ivermectin Plus (also Noromectin Plus, against liver fluke) as the most commonly used wormer. They recommend to worm everyone the injection dose (1 cc/ml per 50 lbs) but by mouth (drench = squirt down throat), repeat the same amount in 10 days, and again in 10 days - all to kill off any of the larvae and eggs that had not matured yet. And of course, rotate pastures if you can...
One of the more knowledgeable employees at Tractor Supply suggested to worm with a fenbendazole type wormer in fall and an ivermectin in spring, to get rid of both types of worms.
Something else mentioned to me by one of the goat exhibitors at the New York State Fair was DiMethox 12.5% added to the drinking water - though the information I can find mention it's not a wormer but against coccidiosis. Anyone have any other ideas?
Looks like our two Boer goat boys have a coccidiosis infection, so they will be medicated the next five days and hopefully Burger will see a complete recovery. He was turning into the incredible shrinking goat and after he got watery diarrhea I had the Cornell Ambulatory Services come by to check him (and Mountain Goat) out. They also took fecal samples for worms, we'll hear about that later (that way I should know for sure which family of dewormer to use).
A good phone number to have on hand if you live locally: the Cornell Ambulatory Services 607-253-3140, part of the Farm Animal Hospital. They charge a flat fee for coming based on mileage ($30 for us and we're on the other side of Ithaca) and then whatever they do. It was surprisingly affordable - and they came four people strong! Apparently it had been a slow day :-)When I asked a Cornell sheep specialist, one of the organizers of the Sheep and Goat Symposium, she emailed the following information:
Cornell Ambulatory Clinic has an excellent goat vet, Dr. Mary Smith who wrote “Goat Medicine”. I think she works mostly in the Ithaca, Danby, Enfield, Brooktondale, Freeville area but I am not sure. She has also helped most of the other Cornell Ambulatory vets become proficient with goats and their prices are similar to those of private vets. The ambulatory clinic can be reached by calling 607-253-3140. The vets are out on the road during the day and there is really no true clinic but their office is manned from about 8 am to 4 pm every day and then calls go through to an answering service. Dr. Pam Karner (272-1398) and Dr. Ann Chafee (387-8405) are private vets who both work with goats and can tell you of other vets that are in private practice that also do farm visits for goats.
Friday, August 20, 2010
Homemade Teat Dip & Udder Wash Recipe
From the Fias Co Farm goat husbandry website:
You need to wash your doe's udder before you milk her and dip her teats after. You can buy all kinds of products to do this with, but I have found it's cheaper and easier to use bleach (Clorox). Bleach is very effective in controlling and preventing mastitis (an inflammation of the mammary gland caused by bacteria). And interestingly enough, I have found that my homemade bleach wash made with Clorox is gentler on my doe's udders them commercial products. I have not had a case of "udder pox" or mastitis since I've started using Clorox udderwash/teat dip. Please do not use cheaper bleach for the wash, it will be harsher on your and your doe's skin.
Make only enough of this wash/dip for each milking. It does not keep. The bleach disperses fairly quickly and you can't guarantee the mixture's sanitizing strength/ability after a few hours. To make an udder wash/teat dip just mix:
- 1 oz (2 T) of bleach (Clorox only)
- one quart of water
- a drop of blue Original Formula Dawn dish detergent (DO NOT use any other formula!)
I like to use the blue, Original Formula, Dawn dishwashing detergent, it's the best I have found. Like Bounty paper towels, I'd never use anything else. Dawn (the blue, original formula) is safe to mix with bleach. You must be very careful when mixing bleach with other products because toxic vapors can result.
To use, wash your doe or cows's udder well with your udder wash and dry with a disposable paper towel (Bounty) . Never place a "soiled" towel back in the wash. This will help keep the wash clean and reduce the risk of spreading any "nasties" from animal to animal. Milk the doe or cow. Now, dip her teats. For a teat dip cup I use disposable 3 oz. "Dixie" cups I buy at Sam's for $5 for 500. I'm not usually a big fan of disposable things, but when it comes to milking, disposable can be a good thing. Disposable means less chances of spreading any contaminates that may be lurking and waiting to spoil your milk or give your doe mastitis. You can use the same cup for all the does you are milking at that time. Dip the teats in the teat dip and let "air dry".
goat milk ice cream
I'm also looking into home made goat milk ice cream - we've had an ice cream maker sitting in our kitchen for almost 10 years now - but are having trouble with the ice cream recipes. For instance, what to do about half and half and whipping cream if it is not available in goat milk and one can not use the readily available cow's milk over the counter versions?
Making a substitute for half and half is as simple as mixing two everyday ingredients. Replace one cup of half and half with 1 tablespoon melted butter, plus enough milk to equal a cup. From Frugal Living at About.com
A substitute for heavy whipping cream can be 1/3 cup butter plus 3/4 cup of milk for 1 cup of cream, in baking or cooking. From WikiAnswers, though I am not sure if cow dairy butter can easily be substituted with plant based margarine (but we'll find out!).
The recipe I'm going to try:
Vanilla Ice Cream (2 qt)
2 cups (goat) milk
1 cup (cane) sugar
dash of salt
1 tsp vanilla extract
plus
1 cup half and half (substitute)
1 cup whipping cream (substitute)
or
ca. 1 3/4 cup goat milk and 1/3 plus a table spoon of butter
though I'm contemplating substituting the cream with chevre, it seems much closer in texture and requires less butter.
Scald the milk until bubbles form around the edge. Remove from heat. Add sugar and salt. Stir until dissolved. Stir in (half and half and whipping cream) butter and vanilla. Cover and refrigerate for 30 minutes. Freeze as directed.
5 cups of crushed ice plus 1 cup of rock salt or
5 trays of ice cubes and 2 cups of iodized table salt and 2 cups of water
depending on texture desired freezing is from 20 to 40 minutes.
Hope this will work!
goat milk soap recipe
came across this blog today - it looks very promising...
Since we now separate the goat kids and moms during the night we get about a half gallon of milk each morning, and it's time to start thinking about making a cheese press and researching goat milk soap recipes!
www.blog.thesage.com/2010/02/10/cold-process-soap-half-and-half-method-with-goats-milk/
Since we now separate the goat kids and moms during the night we get about a half gallon of milk each morning, and it's time to start thinking about making a cheese press and researching goat milk soap recipes!
www.blog.thesage.com/2010/02/10/cold-process-soap-half-and-half-method-with-goats-milk/
haybin plans for goats and other small livestock
During our trip to the Netherlands I noticed two types of hay bin desings I wanted to further check out. I took a bunch of pics of both of them and decided to try and built the one with the feeding tray for our flock. I have a small rectangular hay bin but I like the built in tray and since the other one is in the kids area now we have a need for another one.
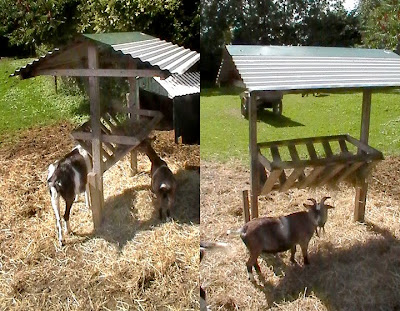
To give you an idea I'll post pics of both, though of course I do not have any blueprint type plans. I might keep track of the measurements of the one we're going to build. Keep in mind the Europe standard is not a 2x4" but more like a 2x3", so judging the measurements is a little tricky. But hey, it does not have the be identical, as long as it is functional :-) I plan to use a piece of sheet metal roofing and will use the width of that to measure everything else from...
 I also like that this version is freestanding, unlike the other one which would need two posts placed in a deep enough secure manner.
Wednesday, August 18, 2010
a boardwalk in the backyard...
Granddad might remember the trouble we went through last year to bushwhack a path to our swamp with the intention to create a swamp boardwalk. Well, even though the pieces have been ready since last year (we have a very friendly neighbor) we were finally able to actually put them in place last week!

Together with actually friendly neighbors Dough and Bill I got the heavy pieces in their general alignment and used the next couple days to fine tune angles, heights and make up filler corner pieces. The pieces are mostly made of 4x4 ish hardwood pallets with an assortment of recycled wood scraps, including old 2x4 & 1x6 decking and packaging wood from Lowe's. I tried to stay away from (new) pressure treated wood - no sense in leaching a bunch of chemicals into our pristine New York State protected wetlands :-)
We have just about enough pallet pieces to make it to the "creek", which is my goal for this year, or phase 1 of the getting to the back forest project. I'll keep my eyes open for more hardwood pallets this year and hopefully next summer, when the ground is relatively dry, Bill will help me out again!
Our toddler Simon and I also made another hiking path to cut through the forested area between the goat pasture and the swamp. Hubbie and I have to do some major chainsawing later to remove the leftover treetop from the maple that came down right over the planned path, but other than that is should be fairly straight forward with my trusty machete and hacksaw. Before we know it we'll be able to hike all the way around the swamp, the forest, the pasture and the meadow without walking anywhere twice, yay.
multiplying backberry bushes
 One technique I found real easy is to loop the long runners which go every which way this time of year through a gallon planter filled with dirt and secure it with some weighty rocks. The looped vine will shoot roots during the rest of the season (as it would otherwise, only into the lawn where you might not want it).
Leave the vine attached until next year, when the shoot comes back up nicely, then cut the main vine. Keep an eye on the rooted vine, water well and when all looks well, transplant late Spring in a good spot, again watering well for at least a couple weeks. Isn't it nice to get free plants from your catalog purchased nursery stock :-)
Of course, this works with all kinds of rooting vines like strawberries & mint and even with currant and gooseberry bushes. Finally a good use for all those fieldstones...
greenhouse progress
 Still working away on the greenhouse... hopefully it will be all done in a couple weeks, just in time to transplant some of the leafy greens to overwinter!
 The frame was finished last fall, but since we did not have a roof covering picked out hubbie Rolf decided not to put the windows in yet either, just in case some weird windstorm would blow them out or something.
We did decide to reuse the aluminum frames that came with the 4x4 foot double pane storefront windows, but as it turned out we mounted them upside down last fall so they all had to come out (including all the wasp nests). Other than the running around while handling heavy, heavy sheets of glass all went relatively well and the front is now finished and looking good!
Last weekend Rolf finished the front, rehung the door and installed the window on the left. Since the shed is leaning badly to the left, installing anything right angled next to it has been a bit of a challenge. Luckely we have a table circular saw now and are able to make nice straight angled cuts :-)
 Next on the list is the back, where we need a door and a similar window on the shed side - and last but not least; the roof top ventilation and the plastic covering... we might need to get some help with the latter, manouvering a 14 feet by 40 feet piece of plastic does not sound like a two person job!
Monday, August 16, 2010
good ground cover for vegetables...
Just read this tip in the current Mother Earth News magazine: to use shredded paper as ground cover for row vegetables like tomatoes and peppers. The paper will become a sort of weed impenetrable layer of paper-mache, but it does still let through water and the whiteness reflects light back up to the plants which in the case of peppers really helps getting the fruit to ripen in time. Something to try next year!
I've always liked to use grass clippings in my pepper window boxes for similar reasons; it also becomes a thick layer that lets thru water but discourages weeds. It does not really reflect light, but it does release nitrates during composting, which might be just as beneficial. Since our peppers are in window boxes anyway they get more heat and ripen fine, even with our short new york summers.
As a side note, most papers including the Ithaca Journal use biodegradable soy bean based inks which are fine to compost back into the vegetable gardens. If you are not sure of the inks used, ask before composting.
Monday, August 2, 2010
sumac "lemonade" recipe
Excerpt from Sumac: The wild lemonade berry By Sam Thayer, Bruce, WI - published by Countryside Magazine
As previously mentioned, the red-berried true sumacs have been widely used to brew a tart and refreshing drink. This drink is delicious, easy to prepare, fun to gather, nutritious, unique-and free. Its source is easily accessible to millions of Americans every summer.
This beverage has been called sumac-ade, rhus-ade, sumac lemonade, Indian lemonade, sumac tea and probably some other names that I have yet to hear. Whatever people call it, they pronounce it delicious. When made properly it is as universally liked as lemonade. I have personally brewed this beverage from staghorn, smooth, and shining sumacs on many occasions. Keep in mind that my experiences refer to these species in the Midwest, and other kinds might need to be treated a little differently.
Preparation of the beverage is simple. The first step is to harvest the berries. Sumac "berries" are really just seeds covered with a thin coating of flavoring substance and hairs. The large clusters are so easy to collect that in just a few moments you can have enough for a pitcher of wild Kool-Aid that kids will love. I usually just snap off the twig that bears the cluster by bending it quickly, although some people use pruning shears or a knife. You want to get the berries when they are dark red and fully mature, so that they have fully developed their tart flavor, but before the rain has had the opportunity to wash the flavor out. In most of North America, the first clusters are ready to be plucked sometime in July, with the prime time being in early August. Taste each cluster as you harvest to assure yourself that you are collecting something with flavor since occasionally they are bland. A dark purple coloration usually indicates that the flavor of the fruit has developed fully; yet some of the best clusters I've tasted were light pink. Sometimes a white, sticky substance coats the berry heads; this is pure essence of sumac flavor-don't let it scare you off. I pluck about six to eight average-sized clusters for a pitcher of sumac-ade. Sumac 'berries' are seeds covered with hairs and a thin coating of flavoring substance.
A potential mistake is to harvest the berry heads before they are ripe, in which case they will produce an unpleasantly bitter brew. More commonly, the problem is that the berries are collected long after their flavor has been washed out by rain. Although I have found good-tasting berries into April, this is the exception; around here the vast majority of them are spent by the end of August. You can expect to find good ones, if you taste around, until early October and sometimes later-and there are always those with just a hint of flavor. To enjoy this refreshing summer beverage in the middle of winter, it pays to harvest the heads in prime time and dry them, so you don't have to worry about using mediocre material.
I take my half-dozen berry clusters, cram them into a pitcher, pour cold water over them, crush them up a little with my hand, and then let the pitcher sit in a cool place for a while. Pouring boiling or hot water over the berries makes for poor flavor, for it leaches tannin from the stems, causing the drink to become bitter. The longer the berries infuse, the stronger the drink will be. When the flavor is to your liking, just strain the drink through a cheesecloth to remove seeds and hairs. Sumac-ade is pleasantly tart with a light pink color. Some people add sugar, but I prefer it without.
The tartness of sumac is partly due to ascorbic acid (vitamin C) so one also has a health incentive to drink this beverage.
There are other things that can be done with sumac-ade. My sister made one of the best wines that I have ever tasted from it. I once prepared a potent sumac concentrate by soaking four batches of berry heads in the same water, one after the other, for one-half hour each. This concentrate made a wonderful and very tart jelly. The flavor is transformed and weakened somewhat by the boiling, so be sure to use a very strong sumac brew for the jelly. Euell Gibbons recommended using sumac-ade instead of plain water to boil elderberry and other fruits that need a touch of tartness to liven them up for using in jam or jelly. Also, the young, thick, tender tips of sumac shoots (especially staghorn) in early summer can be peeled and eaten raw or cooked. They are sweet and delicious, much like raspberry stalks.
Since sumac is related to cashews and mangoes, anyone allergic to those foods should avoid it, or proceed with extreme caution. All in all, however, the sumac is a wonderful tree, deserving of much more attention from those who love the outdoors. Unfortunately, the fact that it shares names with a tree of ill-repute has caused many to shun it. That does leave more for us, but either way there's plenty of sumac to go around. Why not try some this summer?
Sam publishes Forager's Harvest. Sample issues are available for $3 from The Forager's Harvest, PO Box 129, Bruce, WI 54819.
Subscribe to:
Posts (Atom)


